I recently picked up an eight year old Flashforge Creator Pro at the thrift store for $20. It was in “as-is” condition because the front control panel no longer functioned. To bring it back to life I decided to convert it to Klipper with the Mainsail web interface.
The Klipper ecosystem was quite confusing when I was getting started, so I’ll lay out a short summary of the components and how they interact with each other.
Klipper is the base motion controller for your 3D printer. If you’re familiar with Marlin, you can think of it the same way. The way Klipper is different is that it runs in two places:
All three of these are web-based user interfaces for 3D printers. Octoprint is the old favorite, but is not “Klipper native”. Klipper essentially pretends to be an old Marlin based printer and allows Octoprint to send it G-Code commands.
Mainsail and Fluidd are both newer UIs designed specifically to talk to Klipper. They both provide access to Klipper’s internal state and allow you to change Klipper configuration options from the web interface.
Moonraker is a Python based web server that allows the web GUIs to interact with Klipper. Moonraker provides access to the Klipper specific information and configuration options that Mainsail and Fluidd user. You will hopefully not need to mess with Moonraker, as it is pre-installed on most Klipper OS images.
The Creator Pro uses a Flashforge fork of the Mightyboard control board designed by Makerbot. It has an Atmel 2560 microcontroller to operate the stepper drivers and process IO.
To install Klipper on the Creator Pro’s control board, you first need a Raspberry Pi running Klippy. I chose to use the MainsailOS image available in the RaspberryPi Imager. MainsailOS comes with Klipper, Moonraker, and Mainsail preinstalled.
When you configure the OS image using the RaspberryPi Imager, make sure you enable SSH. You will need to SSH into the Pi to install Klipper on the control board.
After MainsailOS (or another Klipper derivative) is installed on your Pi, SSH into the Pi. Power on your Creator Pro and connect it to the Pi using the USB cable. A new folder will appear: /dev/serial/by-id/ (if /dev/ does not contain the serial folder, you have a problem with your USB connection). Run ls to find the serial device for your printer.
ffklipper:~ $ ls /dev/serial/by-id/
usb-MakerBot_Industries_The_Replicator_85830303539351013041-if00
In my case, the full path to my printer’s serial device is /dev/serial/by-id/usb-MakerBot_Industries_The_Replicator_85830303539351013041-if00
We’re now ready to compile Klipper and flash it to the control board over USB.
cd ~/klipper and run make menuconfig. The only thing you need to change here is the Microcontroller Architechture and Processor Model.
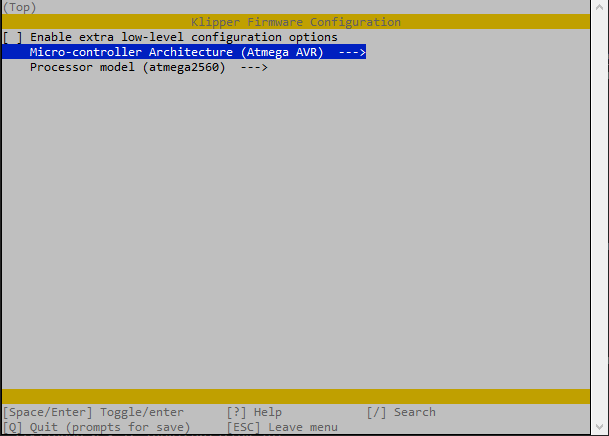
Press q once you’ve changed these values, and run make from the terminal to build Klipper. After building, you would normally be able to run make flash to send the firmware to the control board, but in my experience make flash is not able to correctly configure avrdude to talk to the board.
To flash the firmware, we can instead run avrdude manually with the following command:
avrdude -c stk500v2 -p m2560 -P /dev/serial/by-id/usb-MakerBot_Industries_The_Replicator_85830303539351013041-if00 -b 57600 -D -U out/klipper.elf.hex
Replace the /dev/... string with the one you found earlier with ls. Congratulations! Your Mightyboard now has Klipper on it.
The last step is to tell Klipper what hardware is connected and how to run it. This is done with a printer.cfg file stored in the ~/printer_data/config folder.
The easiest way to modify the config is to use the Mainsail web GUI. Browse to your Pi’s IP address in a browser and you should see the Mainsail GUI. Click the “Machine” button in the left menu to view the printers config files.
Initially there will not be a printer.cfg file. Click the “Create File” button and create it. The Klipper GitHub repository has a sample config file for this printer that you can paste in: https://github.com/Klipper3d/klipper/blob/master/config/printer-flashforge-creator-pro-2018.cfg
There are a few changes I suggest making, you can find them here. I’ve corrected the X axis travel, configured the fans properly, and added the correct [include mainsail.cfg] to use the mainsail GUI.
After saving the printer.cfg you should be able to restart Klipper and start using your printer!
 Peter Den Hartog - Blog