I’ve been solving crackme challenges from crackmes.one in Ghidra lately, and FatMike’s CrackMe#1 is the first real “challenge” I’ve solved on after stepping up from the more trivial challenges like the ioli Crackmes.
This is a tutorial to introduce you to reverse engineering in Ghidra and demonstrate how I solved this crackme. For those unfamiliar, a crackme is a reverse engineering challenge with a specially constructed binary. The binary is usually something like a simulated serial number checker with the goal being to find a valid serial number by looking at the binary’s code. In this case, CrackMe#1 shows a window with a Serial field and displays a “Try Again!” dialog on an incorrect entry:

The first step in reverse engineering an unknown Windows binary is getting a VM set up to do your work in. Windows Defender triggers on this CrackMe because of the binary obfuscation techniques used and it’s just general good practice to isolate your reverse engineering workspace.
Install JDK 21, Ghidra and a debugger in a virtual Windows machine. I chose to use x64dbg. Additionally, I recommend CFF Explorer and PE-Bear to make initial exploration of the executable much easier.
Download the crackme and extract it to a project directory. Create a new project in Ghidra and import the binary. You will see that it is a 32-bit Windows ELF:

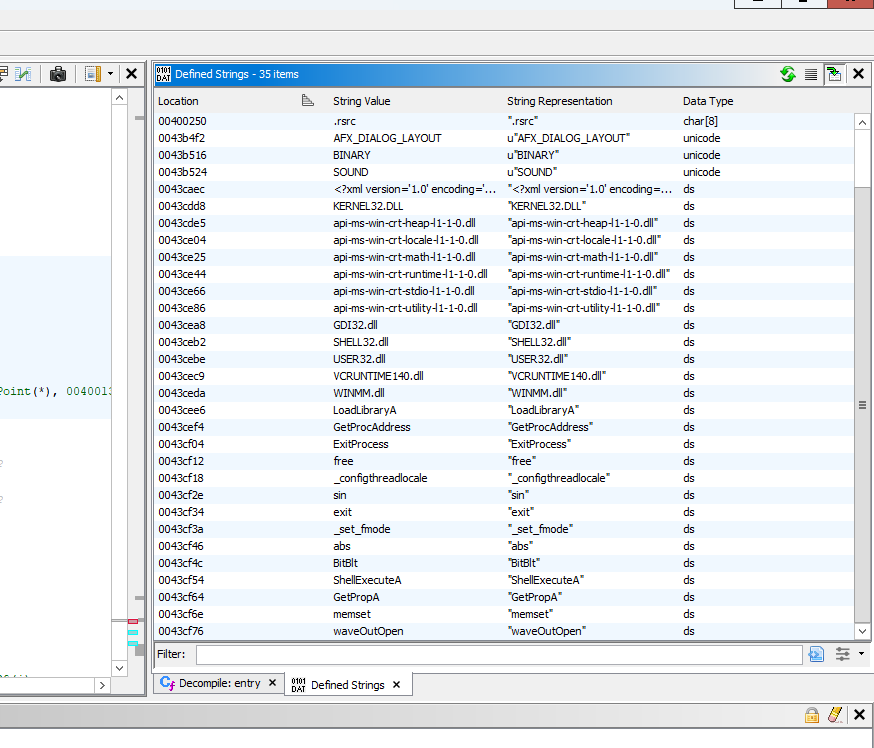
You can drag the .exe onto the CodeBrowser icon in the toolbox and let Ghidra analyze it. The default settings for analysis are fine here. Usually a good first step in Ghidra is to open up the Defined Strings window and see if we can find anything that looks important (“Key is Correct” or similar). In this case, things might look a bit confusing: 
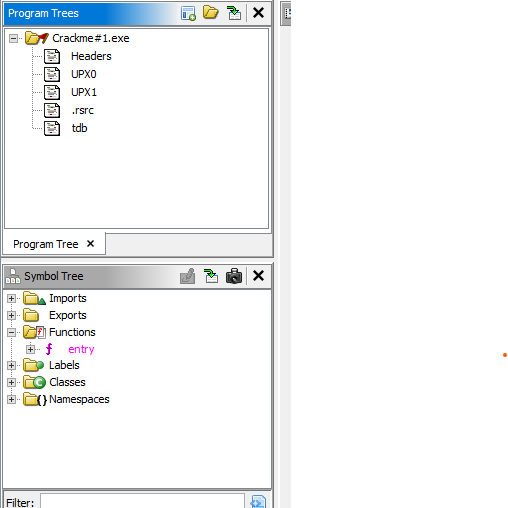
There doesn’t seem to be anything here! This could be because the author of the CrackMe has not hard coded any strings and is generating them at run time, but in this case the Ghidra Program Tree gives us a big hint:

The program data sections don’t contain anything except two large sections called UPX0 and UPX1 and Ghidra was also not able to find any functions other than the entry point. This tells us that the binary has been compressed with a packer. The _entry function’s only job is to load the compressed data from the UPX0 and UPX1 sections at runtime and insert the real program code into memory.
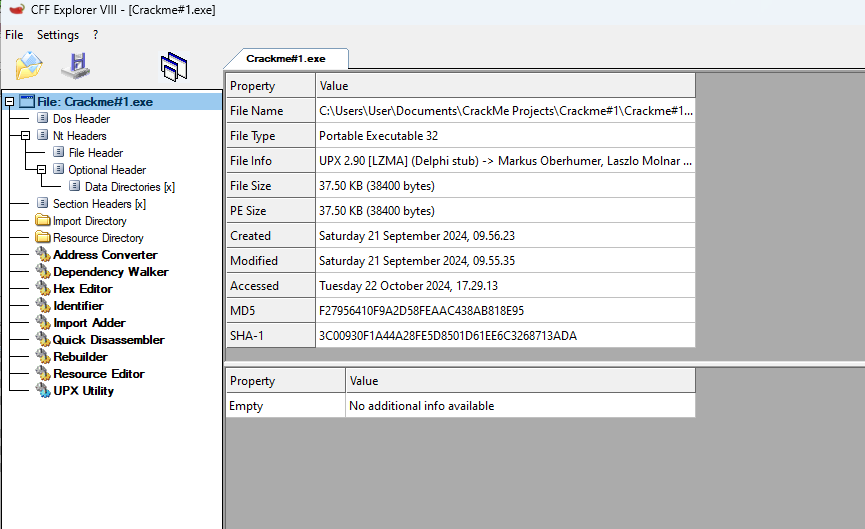
Let’s open CrackMe#1.exe up in CFF Explorer to confirm. Right away you’ll see that “File Info” is listed as “UPX 2.90”, confirming that the binary has been packed.

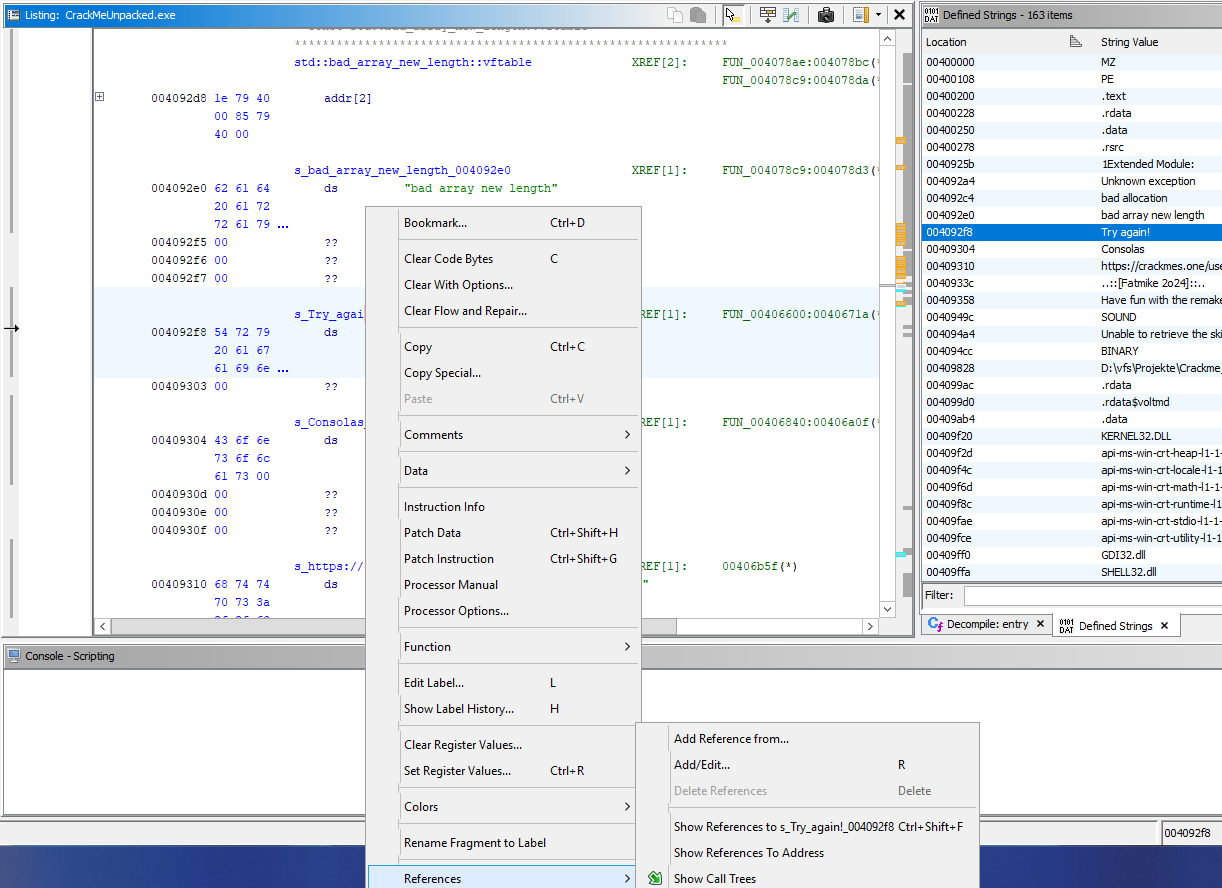
Click on UPX Utility on the left hand side and run the “unpack” command. File->Save As under a new filename (I used CrackMeUnpacked.exe). Import the new .exe into Ghidra and run Analyze again. This time we’ve gotten somewhere. You’ll notice that several functions have been identified and that the Defined Strings tab now contains several new items.
Move to the Defined Strings tab and take a look at the new strings. We’ve got some that are obviously GUI / event handler related and those are where we want to start. Select the string “Try Again!” and right click on the data item in the Listings tab. Select References->Show References to Address to view the locations in the decompiled code where the string is used.

In this case, the string is only used in one place and it’s obviously a failure check on the string entry field:
undefined4 __cdecl FUN_00406600(LPVOID param_1)

{
  int iVar1;
  // SNIP init
  iVar5 = 0;
  do {
    // SNIP data processing while loop
  } while (iVar5 < 0x18);
  iVar1 = FUN_00406490();
  if ((iVar1 == 0x5a6aa47d) && (DAT_0040b4ec == 0x16)) {
    dwProcessId = GetCurrentProcessId();
    hProcess = OpenProcess(0x28,1,dwProcessId);
    BVar3 = WriteProcessMemory(hProcess,param_1,&DAT_0040b568,0x18,(SIZE_T *)0x0);
    return CONCAT31((int3)((uint)BVar3 >> 8),1);
  }
  uVar4 = MessageBoxA(DAT_0040b4f0,"Try again!",s_Information_0040b028,0x40);
  return uVar4 & 0xffffff00;
}
It looks like we have a function with some kind of data processing loop (the do .. while section), a call to extra processing (iVar1 = FUN_00406490();) and then an if check on the return value from that call. If two conditions are met ((iVar1 == 0x5a6aa47d) && (DAT_0040b4ec == 0x16)) the code does some interesting stuff with WriteProcessMemory and then returns without showing the “Try Again!” dialog. Interesting!
It seems like we probably need to enter a serial that results in the return value from FUN_00406490 being 0x5a6aa47d and a second global variable DAT_0040b4ec being 22.
Let’s start breaking the code down into chunks and try to understand them individually. Click on the signature of FUN_00406600 and press L to label the function. Let’s rename it to check_input for now as a guess.
We need to find what calls check_input. Right click on check_input and use References->Find references to check input. Apparently, nothing! At least on Ghidra 11, no decompiled code seemed to reference check_input. At this point, the function call could either be obfuscated or Ghidra simply might have missed some code on the first pass. Go back to Defined Strings and this time let’s find references to the string “Have fun with the remake of my first crackme …”.

This code where the other dialog string is used does not look fully decompiled. Directly above it, there are a series of bytes that look like instructions that were skipped. Scroll up to the top of the byte block and press D to decompile them.

There’s our call to check_input! It still looks like a slice of a larger function, so press A and re-analyze the file now that we’ve found more valid code. Now things start to make sense:

The things that looked like partial functions were actually case: statements in a large switch()! The function is now decompiled and it looks like an event handler from a GUI.
HBRUSH FUN_00406840(HWND param_1,uint param_2,HDC param_3)

{
  // SNIP init
  if (param_2 < 0x111) {
    // SNIP GUI code
  }
  else if (param_2 == 0x111) {
    switch(param_3) {
    case (HDC)0x3ea:
      DAT_0040b4ec = GetDlgItemTextA(param_1,0x3e9,&DAT_0040b514,0x32);
      check_input((LPVOID)0x406be1);
      break;
    case (HDC)0x3eb:
      MessageBoxA(param_1,
                  "Have fun with the remake of my first crackme from 2005! It is pretty easy to solv e so it\'s also good for beginners.  The goal is to find the valid serial. A windo w will pop up to let you know you found it :-) There is only one valid serial.  Ch eck the readme file for more information.  Fatmike"
                  ,"..::[Fatmike 2o24]::..",0x40);
      return (HBRUSH)0x1;
    case (HDC)0x3ec:
    // SNIP more case statements
  }
  // SNIP else statement
}
This code gets a text string using GetDlgItemTextA and stores the length of the string in DAT_0040b4ec and the string itself in DAT_0040b514. Lets rename those globals (L key) to input_length and input_string. Now we know where the string being passed to check_input comes from. Let’s label this function handle_event.
One final thing to notice is that a memory address is being passed to check_input:
        00406bcf 68 e1 6b        PUSH       LAB_00406be1  ; This address is being passed to check_input
                 40 00
        00406bd4 e8 27 fa        CALL       check_input
                 ff ff
        00406bd9 83 c4 04        ADD        ESP,0x4
        00406bdc 83 f8 00        CMP        EAX,0x0       ; A return value from check_input?
        00406bdf 74 2f           JZ         LAB_00406c10  ; Skip NOP_BLOCK on non-zero return val
                             LAB_00406be1                                    XREF[1]:     00406bcf(*)
        00406be1 90              NOP                      ; Why would we run this code?
        00406be2 90              NOP
        00406be3 90              NOP
The address that’s passed in is actually right below the function! It’s a big block of NOP instructions. There also seems to be a value returned from check_input in the EAX register. After the call to check_input the return value is compared to zero. If zero, a JZ instruction jumps over the block of NOPs, but if something non-zero is returned they would be executed like normal instructions… Let’s rename LAB_00406be1 to NOP_BLOCK and go back to check_input.
Back in check_input, let’s update the function signature with what we’ve learned. Press F to edit the function and add a uint return value. You can see Ghidra automatically assigns the EAX register to handle it. Rename param_1 to nop_pointer as well, since we know that’s what’s being passed in now.

Let’s dig into this do .. while loop now:
  iVar1 = 0;
  iVar5 = 0;
  do {
    if ((&input_string)[iVar1] == '\0') {
      iVar1 = 0;
    }
    iVar2 = iVar1 + 1;
    (&DAT_0040b568)[iVar5] = (&DAT_00409480)[iVar5] ^ (&input_string)[iVar1];
    if ((&DAT_0040b515)[iVar1] == '\0') {
      iVar2 = 0;
    }
    // SNIP 5x more similar operations
    iVar5 = iVar5 + 6;
  } while (iVar5 < 0x18);
This looks like a loop that moves through input_string one character at a time and XORs it with a string stored in DAT_00409480. The result is then stored in DAT_0040b568. The loop performs the XOR for 6 characters each iteration, up to a length of 0x18, or 24 characters. Let’s clean up the labels and data types of these global variables to make the code readable.
Relabel the globals on this first XOR as follows:
(&xor_output)[output_index] = (&xor_constant)[output_index] ^ (&input_string)[input_index];The following lines still look like a mess though:

This is because Ghidra is not interpreting the globals we just re-labeled as arrays. It’s treating each indexed memory access as a brand new global variable. Double click on xor_output to be taken to the code listing for its address. Select xor_output and the next 23 items and press C to clear Ghidra’s interpretation of them. Next, click on xor_output and press T to open the Data Type chooser. Enter char[24] to configure xor_output as an array of 24 characters. Now Ghidra can correctly interpret indexed access to the global variable.

Do the exact same thing for xor_constant and input_string to fix all the array access. Looking at the loop now, we can see that it’s taking the XOR of each character in input_string with a character from xor_constant. The result is stored in xor_output.
After the input has been XORd, another function is called. I’m not going to break this one down entirely, but the major hint about its function is this call in another loop:
        004064c0 81 f2 20        XOR        EDX,0xedb88320
                 83 b8 ed
0xedb88320 is the CRC32 polynomial, so we can assume that this function computes the CRC32 checksum of xor_output. Let’s label the function crc_32_chksum. Label the variable it returns crc_32 (use the “Split Out As New Variable” menu item, since it re-uses an index register from the loop above).
Now the final bit of code in check_input is starting to make sense. We’re XORing our input, computing the CRC32, and then checking if our input string is 22 characters long and the CRC32 matches a specific value.
  crc_32 = crc_32_chksum();
  if ((crc_32 == 0x5a6aa47d) && (input_length == 22)) {
    dwProcessId = GetCurrentProcessId();
    hProcess = OpenProcess(0x28,1,dwProcessId);
    BVar2 = WriteProcessMemory(hProcess,nop_pointer,xor_output,0x18,(SIZE_T *)0x0);
    return 1;
  }
This is the whole trick of the program. When we input the right serial string, it gets XORd with a magic string and then written into the instruction space of the program if it matches the right CRC32. Afterwards, the check_input function returns 1 which causes handle_event to execute the block of memory (previously filled with NOPs) that we just overwrote.
Jump back into the Defined Strings browser and look for another string with the test “Well Done!”. This string is used once in the code listing, but it looks like a joke designed to mislead us into thinking we’ve found the success function:
  // Snip
  s_Well_done!_0040b038[0] = 'W'; // Called during some init code
This code doesn’t do anything at all. We would expect a code block somewhere very similar to the one that pops up “Try Again!” but using the “Well Done!” string. It’s looking like we are going to have to construct our own success message box using the xor_output of our serial string.
Luckily, we’ve know the target output we need to create is 24 bytes (the length of our XOR do ... while loop) and it probably needs to create a dialog box similar to the “Try Again!” when we input the wrong serial.
One possible method would be to brute force an xor_output string that has the CRC32 value 0x5a6aa47d. This would be great, except it
Here’s the assembly code to create the “Try Again!” dialog:
6a 40           PUSH       0x40
68 28 b0        PUSH       0x0040b028                           = "Information"
40 00
68 f8 92        PUSH       0x004092f8                            = "Try again!"
40 00
ff 35 f0        PUSH       dword ptr [DAT_0040b4f0]
b4 40 00
ff 15 dc        CALL       dword ptr [->USER32.DLL::MessageBoxA]
90 40 00
With one little change, we could make this pop up a dialog box that says “Well Done!”:
6a 40           PUSH       0x40
68 28 b0        PUSH       0x0040b028                           = "Information"
40 00
68 38 b0        PUSH       0x0040b038                            = "Well done!"
40 00
ff 35 f0        PUSH       dword ptr [DAT_0040b4f0]
b4 40 00
ff 15 dc        CALL       dword ptr [->USER32.DLL::MessageBoxA]
90 40 00
If you count the instruction bytes on the left, it’s 24 bytes long! Pretty promising. We know the actual password is the XOR of our xor_output string and XOR is an invertible operation.
I wrote a small C program that XORs the bytecode we created above with the xor_constant string as well as computing its CRC32.
#include <stdio.h>
#include <string.h>
#include <stdint.h>
#define POLYNOMIAL 0xEDB88320
#define CRC32_INITIAL 0xFFFFFFFF

const unsigned char xor_constant[24] =
{
	0x09, 0x32, 0x09, 0x4b, 0xdb, 0x2d,
	0x65, 0x1b, 0x16, 0xdf, 0x2e, 0x65,
	0xd2, 0x5e, 0x99, 0xd7, 0x2b, 0x73,
	0xd2, 0x74, 0xaf, 0xe3, 0x23, 0x72
};

void simplified_xor(unsigned char * input_store, int input_len, unsigned char * xord_data) {
	int input_index;
	int output_index;
	input_index = 0;
	output_index = 0;
	do {
		/* If we reach the end of the input_store, loop back to the beginning and keep
		   XORing */
		if (input_index >= input_len) {
			input_index = 0;
		}
		xord_data[output_index] = xor_constant[output_index] ^ input_store[input_index];
		input_index = input_index + 1;
		output_index = output_index + 1;
	} while (output_index < 24);
}

uint32_t crc32_reflected(uint8_t *data, size_t length) {
	uint32_t crc = CRC32_INITIAL;

	for (size_t i = 0; i < length; i++) {
		crc ^= data[i];  // XOR byte into least significant byte of crc

		for (int j = 0; j < 8; j++) {  // Process each bit in byte
			if (crc & 1) {
				crc = (crc >> 1) ^ POLYNOMIAL;
			} else {
				crc >>= 1;
			}
		}
	}

	return crc ^ CRC32_INITIAL;  // Final XOR step
}

int main() {
	unsigned char target_output[] = {
		0x6a, 0x40,                         // PUSH       0x40
		0x68, 0x28, 0xb0, 0x40, 0x00,       // PUSH       0x0040b028
		0x68, 0x38, 0xb0, 0x40, 0x00,       // PUSH       0x0040b038 "Well done!" string
		0xff, 0x35, 0xf0, 0xb4, 0x40, 0x00, // PUSH       dword ptr [DAT_0040b4f0]
		0xff, 0x15, 0xdc, 0x90, 0x40, 0x00  // CALL       dword ptr [->USER32.DLL::MessageBoxA]
	};

	unsigned int out_crc32 = crc32_reflected(target_output, 24);
	printf("Checksum: %x\n\n", out_crc32);

	printf("A: Input data \nB: Output of XOR\nC: Sanity check\n\nA: ");
	for(int i = 0; i < 24; i++) {
		printf("0x%2.2x ", target_output[i]);
	}

	printf("\nB: ");
	unsigned char xord_data[24] = {0};
	simplified_xor(target_output, 24, xord_data);
	// Note the extra two characters.
	// They will be a copy of the first two characters ("c", "r")
	// since the string is looped if less than 24 characters long
	for(int i = 0; i < 24; i++) {
		printf("%4c ", xord_data[i]);
	}

	printf("\nC: ");
	unsigned char revert_data[24] = {0};
	simplified_xor(xord_data, 24, revert_data);
	for(int i = 0; i < 24; i++) {
		printf("0x%2.2x ", revert_data[i]);
	}
	printf("\n\n");

}
Running this code produces the following output:
Checksum: 5a6aa47d

A: Input data
B: Output of XOR
C: Sanity check

A: 0x6a 0x40 0x68 0x28 0xb0 0x40 0x00 0x68 0x38 0xb0 0x40 0x00 0xff 0x35 0xf0 0xb4 0x40 0x00 0xff 0x15 0xdc 0x90 0x40 0x00
B:    c    r    a    c    k    m    e    s    .    o    n    e    -    k    i    c    k    s    -    a    s    s    c    r
C: 0x6a 0x40 0x68 0x28 0xb0 0x40 0x00 0x68 0x38 0xb0 0x40 0x00 0xff 0x35 0xf0 0xb4 0x40 0x00 0xff 0x15 0xdc 0x90 0x40 0x00
We can see that the CRC32 of our target bytecode is correct! Therefore, the result of the XOR is our serial key: crackmes.one-kicks-ass

Success! We’ve found the key that generates the correct bytecode to pop up the “Well Done!” message and have solved the crackme.